Key Takeaways
- The DNS server provided by your ISP may not be the fastest or most secure option.
- Google DNS, OpenDNS, and Cloudflare are excellent free DNS servers that can enhance internet speed and security.
- You can easily change the DNS server settings using the Settings app in Windows 11.
If the default DNS server provided by your ISP seems slow, unsafe, or unreliable, you don’t necessarily have to stick with it. Here’s how you can change the DNS server settings on a Windows 11 computer.
How to Change DNS Server in Windows 11
A Domain Name System (DNS) translates human-readable domain names into IP addresses, allowing browsers to load web pages on your screen. When your ISP initially establishes your internet connection, it also configures the default DNS settings for you.
However, for most ISPs, the security or privacy of your DNS isn’t much of a priority, leaving you susceptible to all kinds of security problems. The good news, however, is that plenty of good third-party options, like Google, Cloudflare, and OpenDNS, offer better internet speeds and enhanced protection.
Here are the primary and alternate DNS numbers from Cloudflare, Google, and OpenDNS that you can use for your new DNS server:
- Cloudflare: 1.1.1.1 and 1.0.0.1
- Google: 8.8.8.8 and 8.8.4.4
- OpenDNS: 208.67.222.222 and 208.67.220.220
While there are several ways to change the DNS server in Windows 11, the easiest one is through the Settings app. Here’s what you need to do:
- Press Win + i to open the Settings app.
- Navigate to Network & Internet > Advanced network settings.
- Click the network adapter available in the Network Adapters section. For example, if you’re connected via Ethernet, select that option. Likewise, choose Wi-Fi if you’re using a wireless internet connection.
- Select the View Additional Properties option.
- Click the Edit button next to the DNS server assignment.
- Under Edit DNS Settings, use the drop-down menu to select Manual and enable the IPv4 or IPv6 toggle.
- Enter the DNS server number in the Preferred DNS and Alternate DNS fields.
- Click Save.
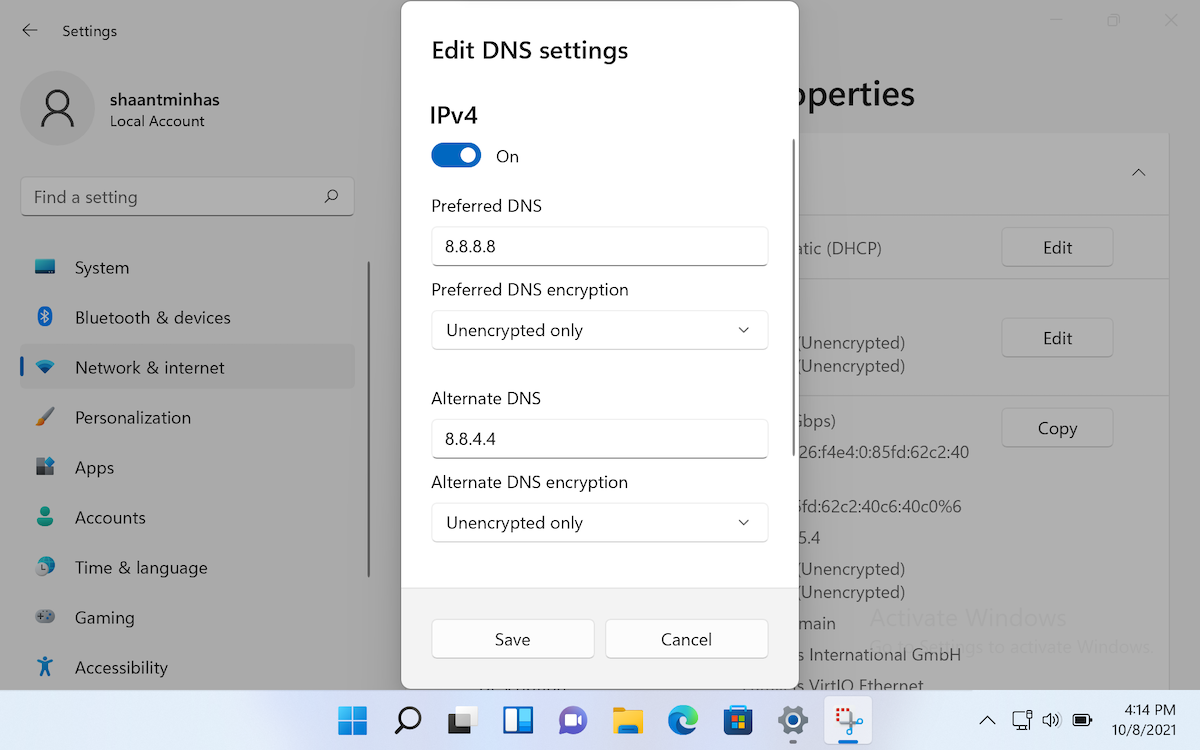

In the guide above, we’ve used Google’s DNS, but you can choose any DNS server you prefer. Once you do, the DNS server settings on Windows 11 will be updated. To verify the change, open Wi-Fi or Ethernet properties to check which DNS server Windows 11 is using.
Changing your DNS server should result in better internet speeds and tighter security in most cases. You can also use DNS speed test tools like NameBench and the GRC DNS Benchmark to find the fastest DNS and optimize your internet speed.